Creating a comprehensive design brief is a crucial step toward ensuring your project’s success. This document acts as a roadmap, aligning expectations between clients and designers, streamlining communication, and setting clear goals from the outset. Whether you’re working on branding, website design, or a marketing campaign, a well-crafted brief provides clarity, direction, and a shared understanding of what needs to be achieved. In this guide, you’ll explore how to develop an impactful design brief in seven structured steps, with insights on what to include and best practices to follow.
Developing a strong foundation begins with understanding the importance of a detailed plan that communicates your project’s core objectives. A design brief not only defines the scope and deliverables but also ensures all stakeholders are aligned regarding timelines, budgets, and expected outcomes. It helps prevent misunderstandings and scope creep, ultimately saving time and resources. Whether you’re an in-house designer or working with freelance professionals, mastering the art of creating effective briefs is essential for producing high-quality results.
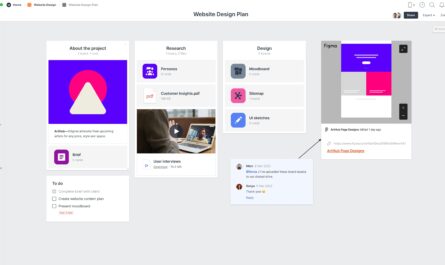
This article will walk you through each step, from initial research to final delivery, emphasizing the critical elements that should be included. Additionally, you’ll learn how to utilize tools like Asana to facilitate collaboration and keep everyone on the same page. Incorporating an online platform for your briefs ensures transparency and easy access for all team members and clients, fostering smoother workflows.
Step 1: Define the Project Context and Purpose
Begin your design brief by clearly stating why the project is necessary. Explain the rationale behind the new design or initiative, detailing how it will benefit the target audience and contribute to the overall brand strategy. Clarify how your creative choices will support the client’s business goals, whether that’s increasing brand awareness, improving user experience, or driving sales.
Providing context helps stakeholders understand the strategic importance of the project. This section should also address how your design fits within the competitive landscape, highlighting what sets the brand apart from others. For technical projects, teams can supplement this with a detailed design document template to capture system requirements, specifications, and dependencies in one organized place. For more guidance on starting your design process, consider exploring your path to a successful web design career.
Step 2: Gather Background Information About the Client
A comprehensive overview of the client or company is essential. This includes basic details such as company size, industry, location, and contact information. Additionally, include insights into their previous projects, current design needs, and brand guidelines. This information demonstrates your understanding of their market and helps build trust early in the process.
Ask yourself questions like: What makes the client unique? What are their primary products or services? What are their core brand values and visual motifs? Understanding these aspects will guide your creative approach and ensure your designs resonate with their target audience.
Step 3: Describe the Project Scope and Deliverables
Outline what specific work will be undertaken. Define the scope of the project, including the types of designs, features, or assets required. Clarify what is within scope and what is outside, to prevent scope creep and manage expectations effectively.
In this section, specify the roles and responsibilities of each team member or stakeholder. For example, who is responsible for initial concepts, revisions, and final approval? Also, describe the key deliverables, such as logo files, website mockups, or marketing collateral. Clearly stating these details ensures everyone understands what the end product should include.
Step 4: Set Clear Goals and Objectives
Identify what success looks like for the project. Are you aiming to improve user engagement, increase conversions, or establish a new visual identity? Define measurable objectives and establish metrics to evaluate progress. This clarity helps keep the project focused and provides benchmarks for assessing whether your design efforts meet the desired outcomes.
Specifying concrete steps and milestones also facilitates planning and accountability. Keep in mind that well-articulated goals guide the creative process and help stakeholders stay aligned throughout the project lifecycle.
Step 5: Understand the Target Audience
Knowing who the design is intended for is fundamental. Develop a detailed audience persona by considering demographics, psychographics, hobbies, and behaviors. If the client already has user personas, review them; otherwise, create new ones based on research.
Use a design idea board to visualize your audience’s preferences and expectations. Consider questions like: What are their hobbies? What challenges do they face? How does the product or service meet their needs? Understanding these factors ensures your design speaks directly to the intended users, increasing its effectiveness.
Step 6: Establish Budget and Timeline
A realistic budget and timeline are critical for project planning. Discuss and agree on how much time each phase will require, from research and concept development to revisions and final delivery. Be transparent about potential challenges and allocate buffer time for unforeseen issues.
Similarly, establish a budget that covers all project costs, including resources, tools, and contingencies. Clear timelines and budgets help manage client expectations and allow your team to prioritize tasks efficiently. For additional insights into managing project timelines, see your guide to a successful web design career.
Step 7: Analyze Competitors and Define Deliverables
Understanding the competitive landscape provides valuable insights into industry standards and opportunities for differentiation. Identify key competitors and analyze their successful design elements and mistakes. This knowledge guides your creative strategy, helping your design stand out.
Finally, detail the expected deliverables, including final files, prototypes, documentation, and any other assets. Clearly outline milestones and review points to ensure the project stays on track and meets all requirements. Check out mastering card design in UI for strategies on creating engaging visual components that can enhance your overall design.
Creating a detailed and organized design brief is the foundation of any successful project. Utilizing tools like shared online systems ensures transparency, facilitates collaboration, and streamlines the entire process. Asana, for example, allows teams to track progress, gather feedback, and manage requests seamlessly. With a well-structured brief and effective project management, your team can deliver innovative solutions that meet client expectations and achieve business objectives.